Choose the right first check in a UK property-maintenance workshop

Product setup views

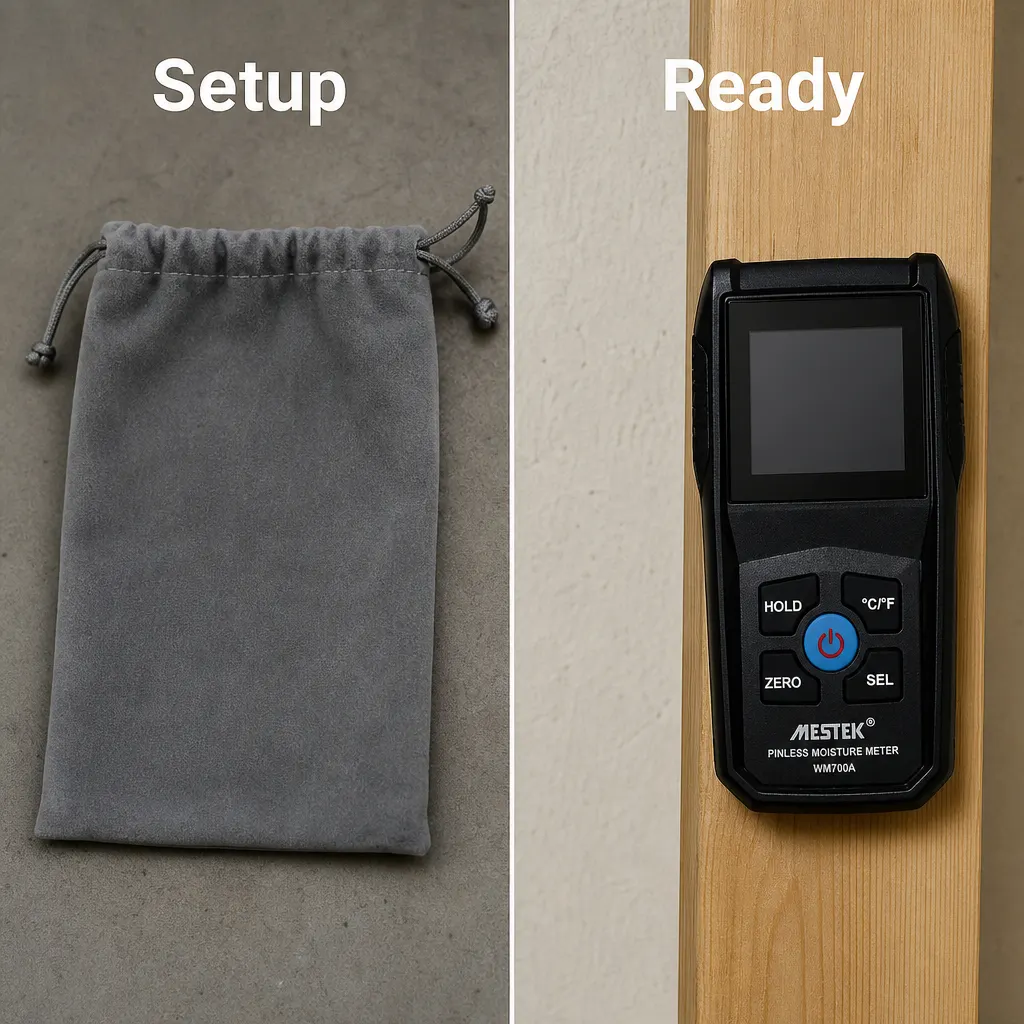
For the best non invasive damp meter for walls, start by choosing a genuinely pinless model and using it for a comparison, not a diagnosis. In the documented WM700A boxed set, the black handheld instrument is marked “MESTEK PINLESS MOISTURE METER WM700A”; the photographed face shows HOLD, °C/°F, ZERO, SEL and a centre power button. That makes it a plausible first-screening choice where preserving a finished surface matters. Before buying, confirm that the supplied English manual covers the wall surface you intend to check, because the available product facts do not state measurement depth, accuracy, scale or material ranges. Then compare a suspect point with a nearby unaffected point and record both.

The job suits a homeowner, occupier, renovator or property-maintenance worker who has noticed staining, peeling decoration, a musty smell, mould or a cold-looking patch and wants better observations before choosing the next step. A wall meter cannot, on the documented information, tell you whether moisture came from condensation, a plumbing leak, rain penetration or another building condition. It can form part of a sensible screening process: locate differences, repeat checks at marked points and see whether a pattern changes after a known repair or drying period. The buying decision is therefore about preserving the surface while gathering comparable information, rather than finding a gadget that settles the whole damp question.

Match the wall finish before trusting a pinless scan

Before comparing models, describe the actual surface in the workshop or room where the check will happen. It might be painted plaster, wallpaper, plasterboard, bare brick, masonry, timber panelling, a skirting edge or a ceiling finish. A pinless format is relevant when you do not want probe marks, and the locked WM700A photograph shows a unit identified as pinless with no visible pin probes. However, pinless does not automatically mean that every finish, thickness or layered construction is covered. The product facts do not list compatible materials, so surface suitability must be confirmed from the English user’s manual or other clear product documentation.

A finished wall may contain several layers, and the visible decoration may not represent the material behind it. Paint, adhesive, plaster, insulation, foil, timber framing and masonry can all change what a surface instrument encounters. Do not treat a reading from a painted internal wall as directly interchangeable with one from bare brick or exposed timber unless the instructions explain that comparison. If the listing does not explain how to use the WM700A on your particular wall construction, record that as an unresolved buying question. A careful buyer should prefer a clearly documented match over a confident promise based only on the word “damp”.

Verify the WM700A identity and controls at the repair bench

Product identity matters because damp-meter listings can mix descriptions, photographs and claims from different instruments. For this choice, look for the exact model marking WM700A on the black handheld unit and check that the image matches the documented face: HOLD, °C/°F, ZERO, SEL and the centre power button. Those details give you a practical way to compare the physical item with the page you are considering. Do not rely on a generic heading such as wall scanner or detector if the photograph does not show the same model. The safest comparison is between the exact model marking, the supplied manual and the photographed controls.

The boxed set is also clearly described: it includes the meter, a grey pouch, a small screwdriver and an English user’s manual. Treat those contents as an identity check, not as proof of a particular measuring range or wall capability. The screwdriver should not be assumed to be a calibration tool unless the manual says so, and the pouch does not tell you how the instrument should be stored. Read the manual before setting up a repeat-check routine, paying particular attention to any instructions for the ZERO, SEL, HOLD and °C/°F controls. If a seller’s description adds technical claims that are not supported by the exact documentation, leave them out of your decision.

Build a repeatable wall map in the property-maintenance workshop

Use this wall-check sequence rather than taking random readings. First photograph the visible patch and note its position in relation to corners, windows, skirting, pipework or the ceiling line. Next choose an apparently unaffected comparison point with the same visible finish, ideally close enough to share the same general room conditions. Mark a small grid around the suspect area so that you can revisit the same places. Before measuring, note whether the surface has recently been cleaned, painted, heated, ventilated or exposed to a repair. Set up the WM700A as the English manual directs, including any instruction for the visible ZERO control, then work through the grid in a consistent order.

Repeatability matters more than collecting a long list of unrelated numbers. Keep the meter orientation, position and movement as consistent as the manual permits, and use the HOLD control only in the way the instructions describe when a displayed result is awkward to read. Write down the point label, the displayed result exactly as shown, the surface finish and the date. Take at least one comparison reading from the unaffected area during the same session. If you return a week later, revisit the same labels rather than choosing new points. This produces a simple moisture map that can show whether a difference is local, broad, shrinking or persistent without leaving pinholes in the finish.

Interpret patterns against a comparison point, not a single wall number

A lone reading rarely gives a useful answer to a damp question. A more sensible approach is to ask whether several nearby points differ from the comparison area and whether the shape of that difference follows the visible staining or cold patch. A cluster near one edge may deserve a different follow-up from a broad change across an entire wall, but neither pattern identifies its cause by itself. Do not invent a universal pass or fail threshold for plaster, masonry, timber or a finished wall. The supplied product facts do not provide a material-specific scale, so use the meter to organise observations and follow any interpretation guidance in the manual.

Keep the log understandable to somebody who was not present at the property-maintenance workshop. Record the date, room, point labels, visible condition, finish, comparison point and any known change since the previous check. Note whether a leak was repaired, ventilation changed, heating was used, a dehumidifier ran or rain affected the outside of the building. If the difference reduces across repeated checks, that is useful evidence of change, but it does not prove that the wall is completely dry or that the original source has been dealt with. If it stays concentrated or returns, take the record to the person investigating the building condition.

Check hidden construction and room conditions for a mismatch

A wall is not always an electrically or materially uniform surface. Hidden pipes, screws, nails, metal framing, foil-backed insulation, conductive salts and layered construction are all reasons to treat an unexpected result as something to investigate rather than an instant diagnosis. If a reading changes sharply beside a known fixing or service route, make a note of that location and compare it with nearby points away from the suspected obstruction. The WM700A product facts do not state how the instrument responds to those conditions, so do not assume that a high or low result is caused only by water. Look for a pattern and check the manual for relevant limitations.

The surrounding environment can also make two checks difficult to compare. A recently washed wall, fresh leak, open window, strong heating, poor ventilation, rain event or active drying equipment may change the surface condition between sessions. Write down those circumstances instead of treating them as background detail. For a fairer comparison, use similar points and make the room conditions part of the record. If the wall has different finishes across the area, separate the map by finish rather than combining everything into one result. These precautions do not diagnose damp, but they reduce the risk of acting on a misleading comparison.

Decide when not to buy a pinless wall meter

Do not choose the WM700A as your sole answer if the job is to identify the source of damp, certify that a wall cavity or floor assembly is completely dry, or provide formal evidence that another party must accept. The available facts identify it as a boxed pinless moisture meter, but they do not document a professional restoration protocol, a certified drying result or a method for separating condensation from penetrating damp, rising damp or a leak. A room humidity sensor would answer a different question, while a professional investigation may require information that a surface screening tool cannot provide. In those situations, use any readings as supplementary observations only.

You should also pause if your decision depends on a published measurement depth, accuracy figure, material range or absolute moisture percentage that is not stated in the documentation available to you. This is especially important in an older property where lime plaster, brick, timber and later repairs may sit together. If your priority is pressing probes into exposed timber, a pinless format is not the same as a pin-type check. Conversely, if preserving paint, wallpaper or joinery is the main concern, a probe-based instrument may create the very surface damage you wanted to avoid. Buy for the actual task, not for the broadest-sounding listing title.

Use this wall-meter buying checklist before the next workshop check

Use this checklist in order. Identity check: confirm the product is the MESTEK WM700A and that the photograph shows the black handheld unit marked PINLESS MOISTURE METER WM700A. Surface check: write down whether you need to examine paint, wallpaper, plaster, masonry, plasterboard, timber or a mixed wall, then look for explicit compatibility. Setup check: confirm that an English user’s manual is supplied and that its instructions cover the ZERO, SEL, HOLD and °C/°F controls shown on the face. Size check: if access is tight around a corner, skirting or ceiling, ask for physical dimensions because no dimensions are stated in the supplied product facts. Do not fill missing information with assumptions.

Content check: expect the documented boxed contents of the meter, grey pouch, small screwdriver and English manual, and question any unexplained additions or substitutions. Environment check: decide how you will record recent leaks, cleaning, ventilation, heating, rain and drying equipment before comparing results. Aftercare check: plan how the handheld unit, manual and screwdriver will stay together between sessions; the grey pouch is part of the photographed set, but the manual should guide storage and handling. Finally, decide where your baseline and repeat points will be marked. If the surface, setup or interpretation remains unclear after these checks, ask for clarification before selecting the instrument.

Take the next step from a documented wall check

After the first map, choose the next action from the pattern rather than from the most alarming individual result. A persistent cluster, a returning stain, an expanding outline or a reading difference that remains after known changes should be taken seriously enough to justify further investigation. A pattern that reduces after a documented repair may support continued monitoring, but it should not be treated as proof that every layer is dry or that decoration is ready. Keep photographs, point labels and dates together so a contractor, surveyor, landlord or insurer can understand what was checked and under which conditions.

The WM700A is a reasonable candidate when your main requirement is a handheld, pinless first screen for accessible finished surfaces and you are prepared to verify its documented wall compatibility. Its exact identity, visible controls and boxed contents are clear, but important technical details such as material coverage, depth and accuracy are not supplied here. That makes an honest comparison more useful than a bold promise: check the manual, establish a comparable baseline, repeat the same points and escalate unresolved patterns. This approach helps you avoid both unnecessary surface damage and false reassurance from a single unexplained reading.