Check a finished kitchen wall without drilling

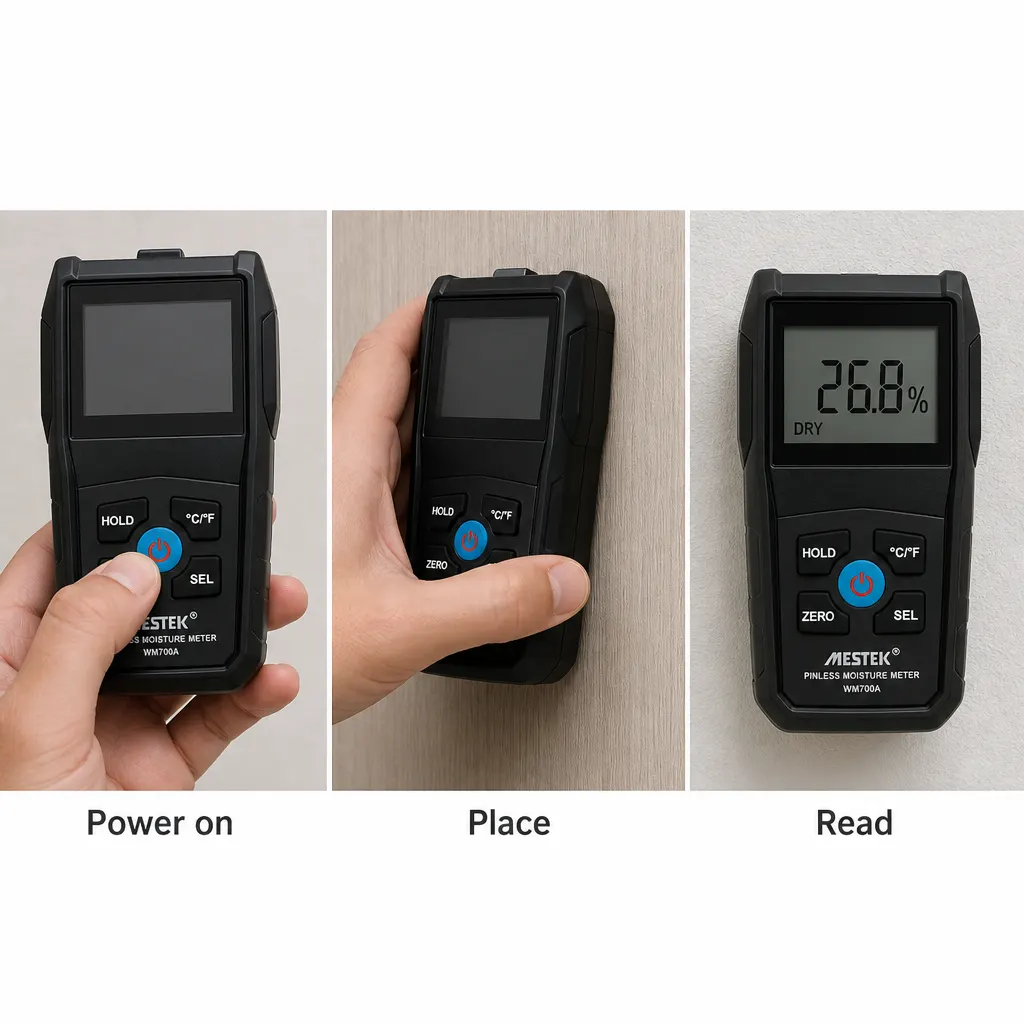
Product use sequence

To check if a wall is damp without drilling, choose several accessible points, compare the suspect patch with a nearby apparently dry area, and repeat the same check at each point and on later dates. A pinless moisture meter is the relevant no-pinhole format. The photographed MESTEK WM700A is identified as a boxed pinless moisture meter, so it is the sort of instrument to consider for an initial screen. Follow the English user's manual for setup and interpretation: the supplied product information does not state the measurement depth, material ranges or a moisture threshold that proves a wall is damp.

That makes this useful for a homeowner, occupier or DIY renovator standing in a UK kitchen beside a stained, cold-looking or musty-smelling area. The immediate job is not to name the cause; it is to find out whether the suspect area behaves differently from comparable nearby surfaces and whether that difference persists. A careful pattern can give you better questions for a builder, landlord, surveyor or drying contractor. It cannot, on the information available, distinguish condensation from a plumbing leak, rain penetration or another building condition by itself.

Set the kitchen scene before you scan the wall

Start with what you can see and record the location in plain language: for example, “beside the kitchen sink, 300 mm above the skirting”—but avoid inventing precise dimensions if you have not measured them. Note whether the sign is staining, peeling decoration, mould, a musty smell or a cold-looking patch, and whether it follows an outside corner, a ceiling line or the edge of a floor. These observations give each reading a place and a reason. Do not move straight from a single visual sign to a treatment decision; first build a small, repeatable record that another person could understand.

Take a photograph from the same general angle and write down the room conditions you know, such as whether the area has recently been cleaned, dried, heated, ventilated or exposed to a leak. The point is not to create a laboratory result. It is to avoid comparing a freshly dried patch with a damp-looking one under completely different conditions. In a kitchen, also distinguish the wall beside a sink or appliance from an internal partition elsewhere in the room. If access is limited by units or finishes, record that limitation rather than forcing the tool into an unrepresentative spot.

Choose a comparable baseline beside the suspect patch

A baseline is the control that makes a no-drill check more useful. Choose an apparently unaffected point made of the same visible finish and, where possible, on the same wall, at a similar height and away from the stain. Then choose two or three suspect points: the centre of the patch, its visible edge and a point just beyond it. If the wall changes from painted plaster to tile, brick or timber, do not present those readings as a like-for-like comparison. The published WM700A information does not document which wall materials or finishes it supports, so your notes should make those differences obvious.

Keep the comparison honest by using the same approach each time. Use the same selected setting if the manual calls for one, hold the instrument in the same orientation and avoid changing the point halfway through a monitoring period. The WM700A photograph shows a ZERO control, but the product information does not explain when or how it should be used; follow the English manual rather than guessing. Record the date, location, visible condition and displayed result. Use the same note format as well, so you can tell a genuine change from a different position, finish or room condition. A baseline is not proof that the reference area is perfectly dry; it is simply a nearby comparison point.

Run a labelled wall-scan sequence in the kitchen

Use this sequence at the kitchen wall: first confirm that the unit is the black MESTEK PINLESS MOISTURE METER WM700A shown in the product photo; second read the English user's manual before switching on; third identify the apparently dry baseline; fourth check the centre, edge and outside points of the suspect area; fifth write down each result beside its location; and sixth repeat the same points later. This sequence preserves the useful part of the exercise—comparison—without turning a handheld reading into a verdict. It also avoids drilling, which is the reason to choose a pinless format in the first place.

A practical checklist is: size—no dimensions are given in the supplied information, so check that the handheld format can reach the points you need; surface—are you comparing the same visible finish; setup—have you followed the manual and used the same control selection; content—is the boxed set actually present with the meter, grey pouch, small screwdriver and English user's manual; environment—has the kitchen wall recently faced cleaning, drying, heating, ventilation or a leak; aftercare—have you saved the date, position, photograph and result so the next check can match it? The visible control labels include HOLD, °C/°F, ZERO, SEL and a centre power button, but their exact operation belongs to the manual.

Read the pattern across the wall, not one number

One displayed value is easy to overread. A more useful question is whether the centre of the suspect area differs from the baseline, whether the edge fades towards the outside points and whether the same relationship remains when you return later. A cluster of differing observations gives you a pattern to discuss; it still does not identify the source. A reading near a sink, for example, may deserve a different follow-up question from a similar-looking patch on an outside wall, but the meter alone cannot tell you which building mechanism is responsible.

Use direction and location in your notes rather than chasing a universal “safe wall” number. If the affected outline appears to shrink after a known repair and later checks follow the same trend, record that as an observation. If it stays in the same place, spreads or changes unpredictably, keep the record and ask for further investigation instead of covering it with paint. The WM700A product information does not provide a material-specific scale, accuracy statement or rule for deciding when plaster, brick, timber or a layered wall is ready for decoration.

Check construction mismatches before trusting the scan

Finished walls are rarely uniform. Paint, wallpaper, plaster, plasterboard, tile, masonry, timber, metal fixings, pipework, foil-backed layers and salts can all create reasons to question whether two points are comparable. That is not a claim that the WM700A will respond in one particular way to each material; the published information simply does not specify the supported construction, sensing depth or interference limits. Treat every change of surface or hidden build-up as a note in the log. If you cannot identify what lies beneath the finish, lower your confidence in a close comparison rather than forcing the readings to fit a preferred explanation.

This is where a no-drill approach has a clear practical boundary. It preserves a finished kitchen wall, but it may leave you with an indirect screen rather than an answer about a cavity, pipe or deep layer. Do not use an apparently low result to dismiss staining, recurring mould or a musty smell, and do not use an apparently high result as proof that a particular treatment is needed. When the construction is mixed or the decision matters, share the map, photographs and context with a suitably qualified person and ask what additional evidence is required.

Know who should not buy this type of meter

Do not choose a pinless meter as your only tool if your job requires a definitive diagnosis of damp source, certified evidence of drying, a guaranteed reading through a particular wall build-up or a material-specific pass-or-fail figure. None of those capabilities is documented for the photographed WM700A. It is also a poor match if you are expecting pin probes: the product photo shows a handheld unit and does not show pin probes. If you need to test exposed timber, compare two unlike surfaces or make a formal decision about decoration, check the manual and the measurement requirement before buying.

It may suit the narrower job of gathering non-destructive observations where pinholes are unacceptable, provided the instructions cover your surface and you are comfortable treating the result as comparative evidence. That distinction matters for a homeowner waiting for a repaired leak to dry, an occupier investigating a kitchen patch or a renovator trying to avoid marking retained finishes. The boxed contents are clear—the meter, grey pouch, small screwdriver and English user's manual—but accessories alone do not establish wall compatibility or diagnostic certainty. Buy for the job you can document, not the answer you hope the display will provide.

Turn the wall scan into a sensible next step

After the first scan, make a one-page log with the room, wall position, visible sign, baseline point, suspect points, date and result. Revisit the same locations under comparable conditions, adding a note when a repair, cleaning, drying, heating or ventilation change has occurred. Keep photographs with the notes. If readings and visible signs improve together, the record can help structure a conversation about whether monitoring should continue. If they do not agree—for example, the display changes but staining returns—treat that as a reason to investigate the mismatch, not as permission to redecorate.

The grounded next step is to check the WM700A identity and the English manual against your actual kitchen wall before relying on it: confirm the pinless format, confirm that the instructions cover the material and setup you face, then use a baseline-and-grid record. If the documentation does not answer those points, or the pattern remains persistent, ask a qualified building professional, landlord or contractor what further inspection is appropriate. This approach answers how to check if a wall is damp without drilling while keeping the decision proportionate: screen first, compare carefully, record what changed and avoid claiming more than the evidence shows.