Start with the damp-looking wall: what a pinless moisture meter for walls UK buyer actually needs

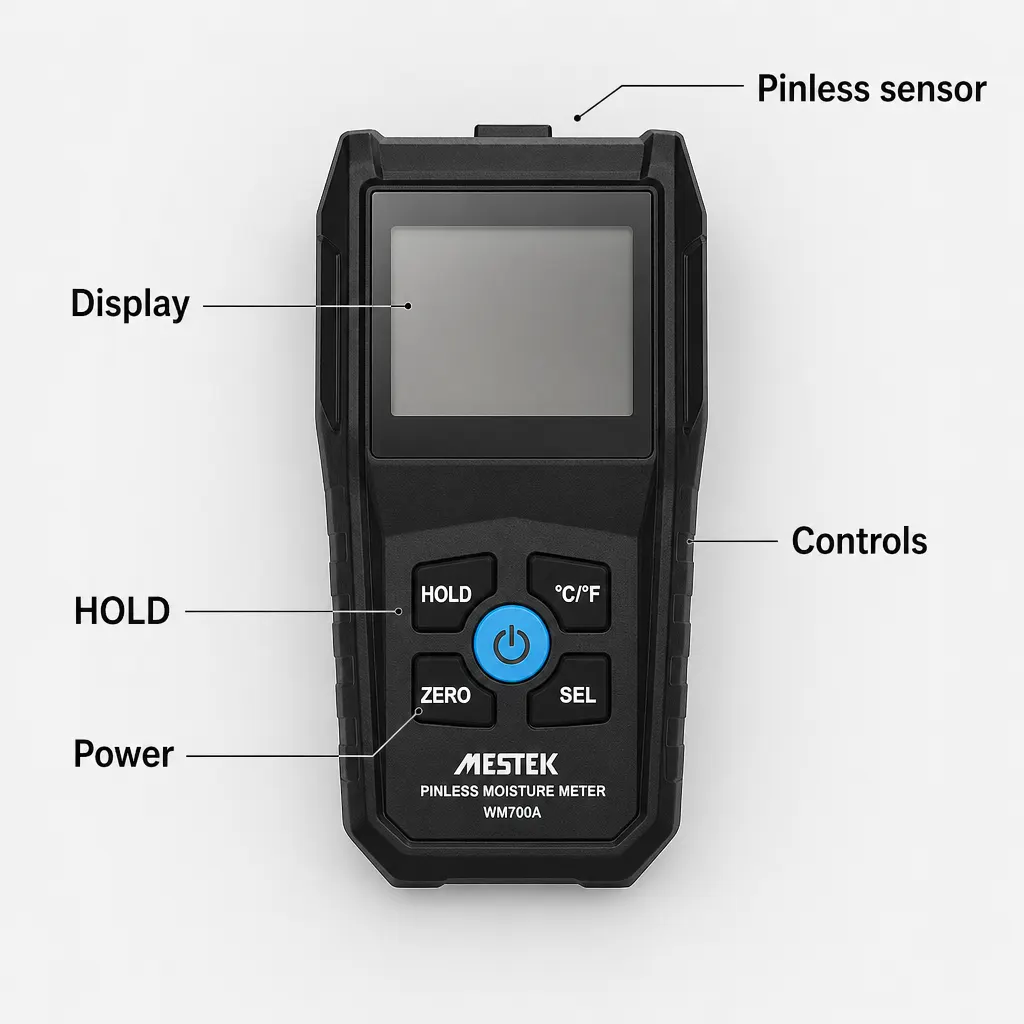
Product feature overview

If you are comparing a pinless moisture meter for walls UK options, start with one rule: use the reading to compare locations and changes, not to declare the cause of damp. With the photographed MESTEK WM700A, note the suspect patch, choose a nearby apparently unaffected area of similar construction, use the ZERO control as directed in the English user's manual, and repeat the same points. If the pattern persists, spreads or conflicts with staining, mould, a musty smell or a known leak, treat it as a prompt for further investigation rather than a diagnosis from one displayed value.

This guide is for UK homeowners, occupiers and DIY renovators who need to investigate a finished wall, ceiling, floor edge or piece of timber without immediately marking the surface. The practical decision is whether you need a pinless, handheld screening routine for comparing an affected area with a baseline. The documented product facts do not provide material-specific moisture ranges, scan depth, accuracy figures or a diagnostic method, so the sensible choice is one that supports careful observations rather than promises an answer about condensation, plumbing leaks, rain penetration or rising damp.

Define the UK property-maintenance workshop job before switching on

At a UK property-maintenance workshop, the useful job is to turn a vague damp-looking area into a repeatable set of observations. You may be looking at a wall, ceiling, floor edge or piece of timber near a leak; the WM700A's photographed identity tells you it is a black handheld pinless moisture meter, but does not explain why the moisture pattern is there. Define the question first: is one part different from a comparable nearby part, and does that difference change after the suspected source is dealt with? This keeps the tool in its proper place alongside visual checks.

For a homeowner working around a terrace house, flat, garage office or renovation room, write down what prompted the check. It could be peeling decoration, a recurring mould patch, a cold-feeling section, a musty smell or staining after heavy rain. After a repaired escape of water, the job may instead be to follow the same marked points while the area dries. These observations give the readings context, while the readings can help you decide which locations deserve closer attention or a suitable professional assessment.

Check the photographed WM700A at the workshop bench

Before scanning, confirm that the instrument in front of you matches the public product identity. The locked photograph shows a black handheld unit marked “MESTEK PINLESS MOISTURE METER WM700A”. Its visible labels are HOLD, °C/°F, ZERO and SEL, with a power button in the centre. Those are the documented controls. No dimensions, moisture ranges, material calibration, accuracy, reading depth, display resolution or formal operating sequence are supplied in the product facts, so do not import figures from another listing or assume that a similar-looking meter has the same specification.

The photographed boxed set includes the meter, a grey pouch, a small screwdriver and an English user's manual. Use the manual for the actual start-up and control sequence, including how ZERO, HOLD, SEL and the °C/°F control operate. The label HOLD is relevant when you need to note a displayed value in an awkward position, but the frozen facts do not describe its exact behaviour. The same caution applies to SEL: its label is visible, yet its purpose and any selectable modes are not documented here.

Run a repeatable wall-grid check in the UK renovation workshop

Once the identity is clear, avoid sweeping the instrument randomly across a wall and then trying to interpret the highest number. Mark a small grid around the visible patch, extending into an apparently unaffected area. Take observations at the same labelled points, and note the finish, room, position and date. If you are checking a repaired leak, photograph the area from the same viewpoint as well. The aim is to create a pattern that another person can understand, not to create a dramatic single result that has lost its location and context.

Working checklist: area and size—mark the patch and its approximate edges, since no meter dimensions or scan area are documented; surface—record whether each point is on painted decoration, plaster, board, timber or another visible finish; setup—follow the English manual and use the same handling at every point; content—check the box contains the pictured meter, grey pouch, small screwdriver and English user's manual; environment—note recent rain, heating, ventilation, a leak or drying equipment; aftercare—write down the date and return the instrument and accessories to the pouch after the check.

Compare the suspect patch with a nearby baseline, not a universal threshold

A baseline is more useful than a number taken in isolation. Choose a nearby area that appears unaffected and is made in a similar way to the suspect area. Keep the points and order consistent, then compare the difference rather than declaring the wall “wet” or “dry” from an undocumented threshold. If the apparently dry point is actually a different layer or finish, the comparison becomes weaker. This is particularly important where a single room contains modern board, old plaster, exposed timber and repaired sections close together.

For repeat checks, mark the points so you can return to them after ventilation, heating, a repair or a period of drying. Record the displayed value and any visible change, and use HOLD only in the way explained by the manual. The °C/°F label should not be confused with a material-specific moisture scale, and the public facts do not state what units or ranges the moisture result uses. Look for a consistent direction or a persistent local difference, not a pass-or-fail verdict.

Check old plaster, timber and layered walls for mismatch risks

Older UK properties often combine materials that should not automatically be compared as though they were identical. Lime plaster, brick, timber, plasterboard, paint, wallpaper and repaired sections can differ in construction and surface condition. The supplied WM700A facts do not publish reference values for any of these materials, nor do they confirm how readings behave through each finish. If your renovation workshop includes a period-property wall, keep the comparison within like-for-like areas and describe the construction in your notes rather than treating every displayed result as directly interchangeable.

Hidden features can also complicate a comparison. Pipes, screws, metal framing, foil-backed insulation, fixings, salts and several layers may sit behind or within a finished surface. If an unusual result occurs directly over a likely service or fixing, mark it as a possible interference point and take nearby readings rather than building the whole decision around it. Do not move the baseline simply to obtain a more reassuring result. If the pattern cannot be separated from the construction, that is a limitation to report, not something the meter can resolve by itself.

After a leak or mould patch, know when workshop notes are not enough

After a repaired leak, use the log to show whether marked areas appear to be changing and whether one section remains different from its comparable reference point. That can make a conversation with a contractor, landlord, surveyor or insurer clearer, because you can identify dates, locations and surrounding conditions. It does not establish that a wall cavity, floor assembly or hidden layer is completely dry. Nor does a lower result alone prove that decoration is ready to cover the original problem.

Arrange further investigation when the source of moisture is unknown, staining returns, mould or odour persists, the affected area grows, or readings remain difficult to compare because the construction changes. Be especially cautious before painting over a repaired patch or accepting a treatment recommendation based on only one location. The product information does not say that WM700A readings are certified evidence or accepted as a substitute for another party's assessment. Keep the meter record as supporting observation, not as a promise about the building.

Take the next step: choose, pause or seek further investigation

Consider the photographed WM700A as a candidate when your priority is a pinless-labelled handheld for repeatable comparisons, and when you are prepared to follow the English manual and keep a dated wall map. The visible ZERO and HOLD labels may suit a method based on a baseline and fixed points, while the boxed pouch, screwdriver and manual are the documented accessories. Pause before choosing it if you need published material-specific ranges, a stated scan depth, a defined moisture percentage, a formal drying sign-off or evidence that applies to a particular wall build-up; none of those facts is supplied here.

Before making a decision at your UK workshop bench, match the product photograph and WM700A marking, read the supplied manual when available, and write down the information you still need. A clear next step is to measure a comparable reference area, repeat the suspect points and compare the pattern with the visual history of the wall. If the result is persistent, contradictory or tied to a hidden service, take those notes into a suitable professional investigation. That approach helps you avoid pinholes while also avoiding the bigger mismatch: asking a screening tool to diagnose the whole building.